Installing fonts on the iPhone is quite easy However, iOS 13 took that functionality to the next level. Apple’s recent introduction of iOS 13 and iPadOS, the company introduced custom fonts for your devices. Here’ how to How to Install New Fonts on iOS 13.

It remains a rather limited feature in that it is not system-wide. Well actually, it’s definitely a step in the right direction. Apple, mostly known for its walled garden, has been hesitant to provide its customers with deep internal access to its software.
Apps available in the App Store were earlier able to work some magic and install fonts. However, iOS 13/iPadOS mark the first time Apple is officially supporting installation.
Find the Font Manager
Before installing the custom fonts, you need to know where to find them. Let’s start with some important thing to know. Custom fonts can only be installed in a small number of apps.
When we say small, we mean really small. As right now, custom fonts are really only going to be good for Apple’s own apps like Mail, Keynote, Numbers and Pages. Adobe has also promised support for custom fonts in their Photoshop and Illustrator apps in the future.
Now, that’s not to say that custom fonts cannot be used in third-party apps. They can be not as part of the default interface. Let’s start with Mail.app as it is a good starting point. Simply follow these steps.
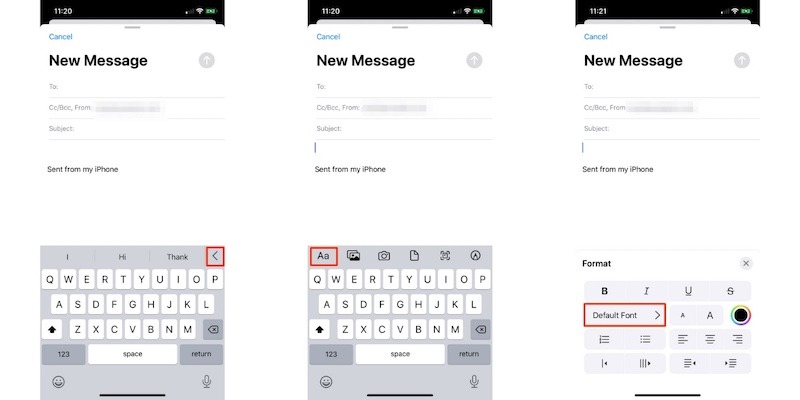
Step 1. To access the font menu, start by drafting an email and tap anywhere in the body of the message. When you will do that, the keyboard will pop up.
Step 2. In the very top row at the far right is a “<” symbol. Click on it and you will see a bunch of options. Find the one on the left which is “Aa” and click on that.
Step 3. Now a menu will appear that replaces the keyboard with another bunch of options. Find “Default Font” in the left column and tap on it. Once you do that, you’ll see all of the available font options you can select from that can appear in the Mail app.
After you install new custom fonts, they will appear automatically in this list.
Download Custom Fonts from App Store
Now we know how to install custom fonts, we then need to find them. Fortunately, this is easy as going to the App Store.
There is a number of popular app options to install custom fonts including Adobe’s Creative Cloud, which can add 1,300 additional fonts for absolutely free. Apps such as Font Diner and Fonteer also provide custom font selections.
Installing Custom Fonts
To make things easy, begin with the Adobe Creative Cloud app to begin installing custom fonts. To do so, just follow the below steps.
Step 1. First of all, open Adobe’s app on your iPhone or iPad as long as you have iOS 13.1 or later installed on your device.
Step 2. Now go to the “Fonts” tab in the app.
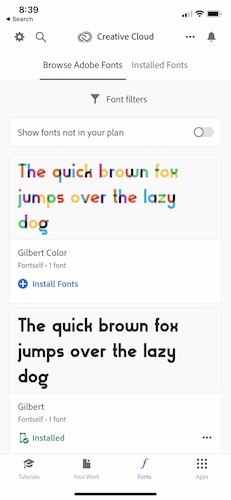
Step 3. After that tap on “Install Fonts”.
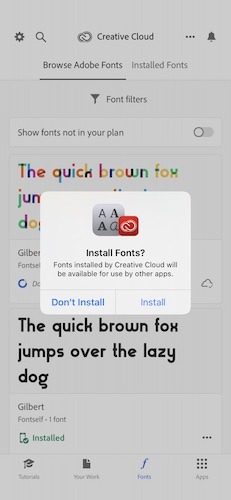
Step 4. Now an iOS system menu will appear. Click on “Install” to begin the installation process.
Step 5. You can now easily look at the entire list of font options. When you find a font you would like to add, tap on “Install Fonts” and add each font individually. There are plenty of unique options so feel free to peruse the whole list with 1,300 fonts available.
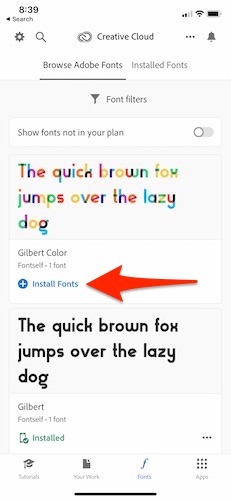
Once the fonts are downloaded, they are automatically get installed on the device. There is really nothing else you need to do at this point.
Managing Custom Fonts
All of your custom fonts are managed in the same place no matter which app you use. This goes for both the iPhone and iPad. To find the fonts, go to “Settings -> General -> Fonts”.
From there you can see all of your existing custom fonts. What if you want to delete a font? That is quite easy. From the Font menu under settings, simply swipe left on any font in the list and then click “Delete”.
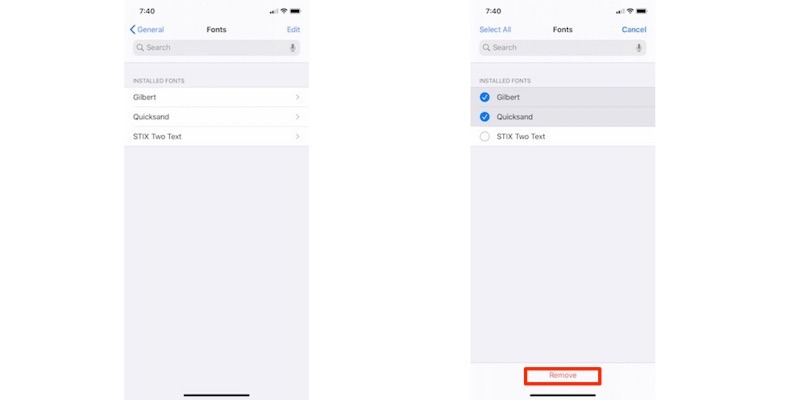
Once you hit delete, the font will be immediately removed from the device. In case you prefer to delete multiple fonts at once then, tap “Edit” in the top right corner and select which fonts you want to remove. When you make your selection, click “Remove” at the bottom of the screen.