Windows 10 usually provides a lot of features. You might have observed that the OS having a lock screen that greets with beautiful wallpapers when you turn on your computer or laptop. Here’s how to disable Windows 10 Lock Screen.
The lock screen basically provides security and takes more time to startup. Some users might feel it is waste to have a lock screen on the computer. In case you want sign-up screen directly then you will have to disable the lock screen. Here’s how to do so.
To Disable Windows 10 Lock Screen
1) Use the Registry Editor:
we are using the Registry Editor to disable Windows 10 lock screen in this method. Follow these easy steps to disable the lock screen.
Step 1: Firstly by using the keyboard press the button Windows+R and type Regedit and click enter.
Step 2: Now you are required to browse to the directory, HKEY_Local_MachineSoftwarePoliciesMicrosoftWindows.
Step 3: Then right-click on the Windows directory and choose New->Key to create a new one.
Step 4: Simply rename the new key as Personalization. On the new folder just right-click and choose the New and DWORD (32-bit) Value.
Step 5: After that rename the created new folder with NoLockScreen and change the value data to 1 and select OK. Now simply restart your computer and the lock screen will not be displayed anymore.
2) Rename the Lock Screen App Folder
Renaming the Lock Screen App Folder method can be used when you do not want to change the registry editor manually. However, this method does not suit all the Windows 10 build. Follow these simple steps to disable the Windows 10 lock screen.
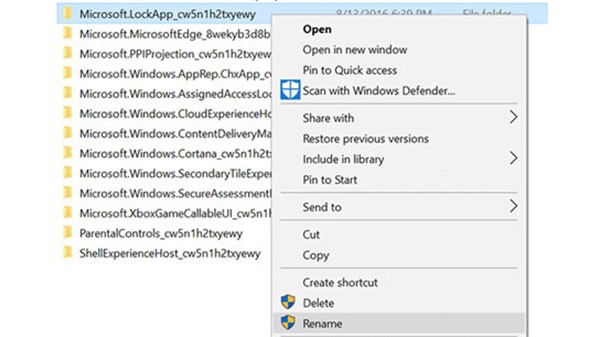
Step 1: Firstly, go to folder C:WindowsSystemApps.
Step 2: Now you can see the folderMicrosoft.LockApp_cw5n1h2txyewy then right-click the folder and rename the folder.
Step 3: Now add .off after the folder’s name to disable the Windows 10 lock screen. This method will help you to disable the lock screen by simply renaming the lock screen app.
3) Using Group Policy Editor:
You can disable the Windows 10 lock screen with the help of the Local Group Policy Editor. To do so follow these some simple steps.
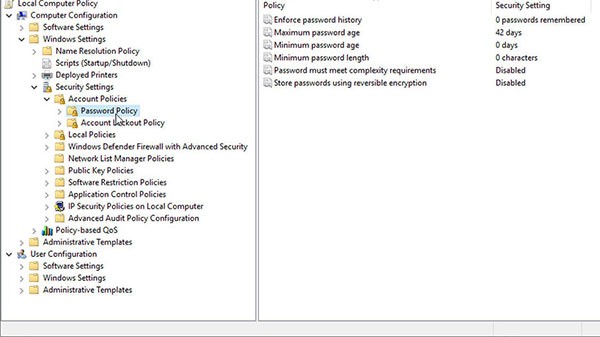
Step 1: First of all click on the Windows+R key, type gpedit.msc, and then select Enter.
Step 2: Now navigate to the specific folder Computer ConfigurationAdministrative TemplatesControl PanelPersonalization. Here select the option “Do not display the lock screen”.
Step 3: From here, tap on the option Enabled and then press on Apply for the changes. This is another simple and easy method to disable the lock screen on Windows 10 and get directly into your computer.