You can now use the Traceroute command on Linux to spot the slow leg of a network packet’s journey and troubleshoot sluggish network connections. Here’s how to use the Traceroute command on Linux.
How Traceroute Command on Linux Works
When you learn how traceroute works, it makes understanding the results much easier. The more complicated the route a network packet has to take to reach its destination, the harder it is to pinpoint where any slowdowns might be occurring.
A small organization’s local area network (LAN) might be more simple. It’ll probably have at least one server and a router or two. While the complexity increases on a wide area network (WAN) that communicates between different locations or via the internet.
Your network packet then encounters and is forwarded and routed by a lot of hardware, like routers and gateways. The headers of metadata on data packets explain its length, where it came from, where it’s going, the protocol it’s using, and so on.
The specification of the protocol explains the header. In case you can identify the protocol then, you can determine the start and end of each field in the header and read the metadata.
Generally, Traceroute uses the TCP/IP suite of protocols and sends User Datagram Protocol packets. The header contains the Time to Live (TTL) field, that contains an eight-bit integer value. Despite the name suggests what, it represents a count, not a duration.
A packet travels from its origin to its destination via a router. Each time the packet arrives at a router, it decrements the TTL counter. If the TTL value ever reaches one, the router that receives the packet decrements the value and notices it’s now zero.
Then the packet is discarded and not forwarded to the next hop of its journey because it has “timed out.” After that, the router sends an Internet Message Control Protocol (ICMP) Time Exceeded message back to the origin of the packet to let it know the packet timed out.
The Time Exceeded message usually contains the original header and the first 64 bits of the original packet’s data. This is defined on page six of Request for Comments 792.
So, if traceroute sends a packet out, however then sets the TTL value to one, the packet will only get as far as the first router before it’s discarded. It will now receive an ICMP time exceeded message from the router, and it can record the time it took for the round trip.
After that, it repeats the exercise with TTL set to 2, which will fail after two hops. Traceroute normally increases the TTL to three and tries again. This process is repeated until the destination is reached or the maximum number of hops 30, by default is tested.
Some Routers Don’t Play Nicely
Some routers usually have bugs. They basically try to forward packets with a TTL of zero instead of discarding them and raising an ICMP time exceeded message.
According to the Cisco report, some Internet Service Providers (ISPs) rate-limit the number of ICMP messages their routers relay.
Some devices are also configured never to send ICMP packets. This is often to ensure the device can’t be unwittingly coerced into participating in a distributed denial of service, like a smurf attack.
Traceroute has a default timeout for replies of five seconds. In case it doesn’t receive a response within those five seconds then, the attempt is abandoned. This means responses from very slow routers are ignored.
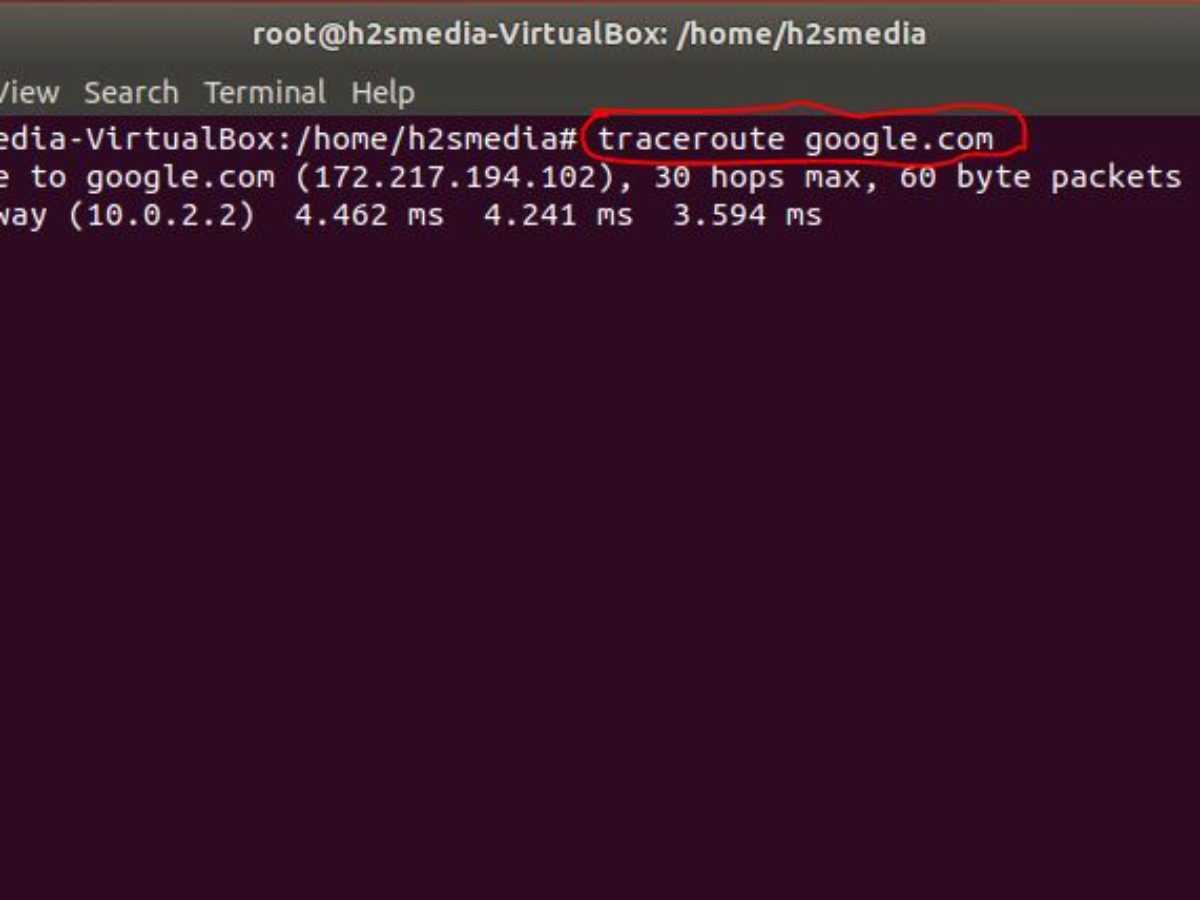
Installing traceroute
Traceroute was already installed on Fedora 31 however it has to be installed on Manjaro 18.1 and Ubuntu 18.04. In order to install traceroute on Manjaro use the following command:
sudo pacman -Sy traceroute

To install traceroute on Ubuntu, use the following command:
sudo apt-get install traceroute

Using traceroute
As we already know traceroute’s purpose is to elicit a response from the router at each hop from your computer to the destination. Some might be tight-lipped and give nothing away, whereas others will probably spill the beans with no qualms.
As an example, we’ll run a traceroute to the Blarney Castle website in Ireland, home of the famous Blarney Stone. Also, the Legend has it if you kiss the Blarney Stone you’ll be blessed with the “gift of the gab.” Let’s hope the routers we encounter along the way are suitably garrulous.
Then we type the following command:
traceroute www.blarneycastle.ie
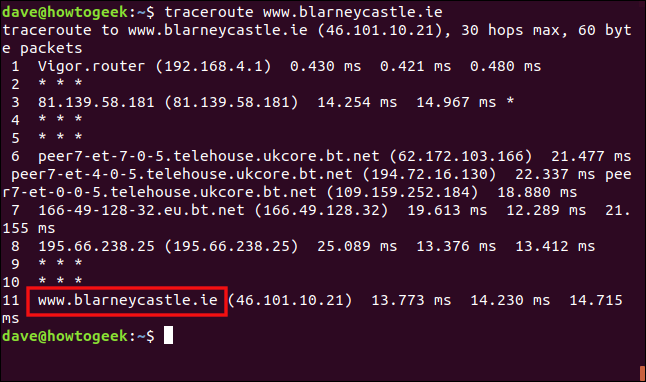
The first line gives us the following info:
1. The destination and its IP address.
2. The number of hops traceroute will try before giving up.
3. The size of the UDP packets we’re sending.
All of the other lines generally contain information about one of the hops. Before we dig into the details, we can easily see there are 11 hops between our computer and the Blarney Castle website. Hop 11 also tells us that we reached our destination.
The format of each hop line is as follows:
1. The name of the device or, if the device doesn’t identify itself, the IP address.
2. The IP address.
3. The time it took a round trip for each of the three tests. In case an asterisk is here then, it means there wasn’t a response for that test. If the device doesn’t respond at all then, you’ll see three asterisks, and no device name or IP address.
Let’s review what we’ve got below:
Hop 1: The first port of call is usually the DrayTek Vigor Router on the local network. This is how our UDP packets leave the local network and get on the internet.
Hop 2: This device didn’t respond. Perhaps it was configured never to send ICMP packets. Or else, perhaps it did respond but was too slow, so traceroute timed out.
Hop 3: A device responded, however, we didn’t get its name, only the IP address. Kindly note that there’s an asterisk in this line, it means we didn’t get a response to all three requests. This could indicate packet loss.
Hops 4 and 5: More anonymous hops.
Hop 6: There’s a lot of text here due to a different remote device handled each of our three UDP requests. The rather long names and IP addresses for each device were printed.
This can happen only when you encounter a “richly populated” network on which there’s a lot of hardware to handle high volumes of traffic. This hop is within one of the largest ISPs in the whole U.K.
Hop 7: This is the hop our UDP packets made as it left the ISPs network.
Hop 8: Again, we get an IP address however, not the device name. All three tests returned successfully.
Hops 9 and 10: Two more anonymous hops.
Hop 11: Now we’ve arrived at the Blarney Castle website. The castle is in Cork, Ireland, however, according to IP address geolocation, the website is in London.
So, it was a mixed bag. Some devices played ball while some responded, however, didn’t tell us their names, and others remained completely anonymous.
But, we did get to the destination, we know it’s 11 hops away, and the round-trip time for the journey was 13.773 and 14.715 milliseconds.
Hiding Device Names
As we’ve already seen, sometimes including device names leads to a cluttered display. In order to make it easier to see the data, you can use then (no mapping) option.
To do this with our example, we simply type the following:
traceroute -n blarneycastle.ie
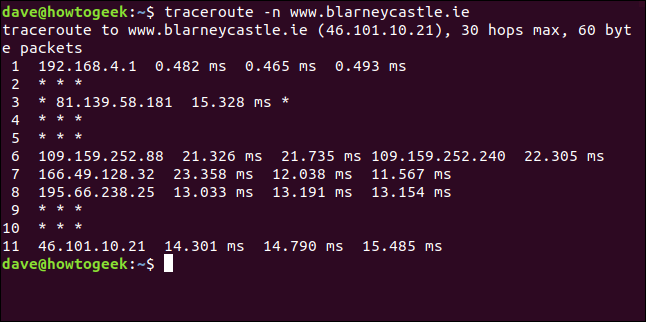
This will make it easier to pick out large numbers for round-trip timings that could indicate a bottleneck.
Hop 3 is starting to look a little suspect. Last time, it only responded twice, and this time, it only responded once. In this scenario, it’s out of our control, for sure.
However, in case you were investigating your corporate network then, it would be worth it to dig a little deeper into that node.
Setting the traceroute Timeout Value
Perhaps if we extend the default timeout period for five seconds then, we’ll get more responses. In order to do this, we’ll use the -w (wait time) option to change it to seven seconds also note this is a floating-point number.
Then we type the following command:
traceroute -w 7.0 blarneycastle.ie
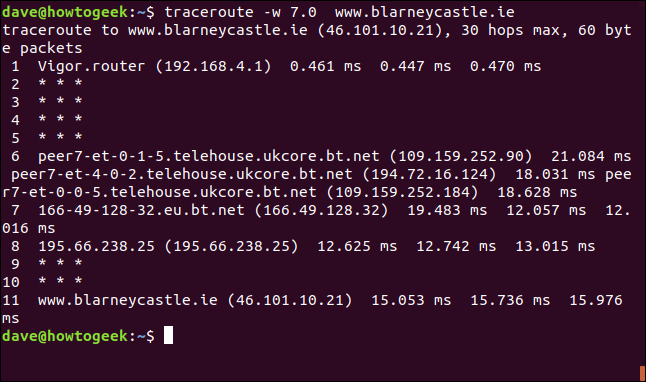
That didn’t make much of a difference, so the responses are probably timing out. It’s likely the anonymous hops are being purposefully secretive.
Setting the Number of Tests
Traceroute sends three UDP packets to each hop by default. We can use the -q (number of queries) option to adjust this up or down.
In order to speed up the traceroute test, we type simply the following to reduce the number of UDP probe packets we send to one:
traceroute -q 1 blarneycastle.ie
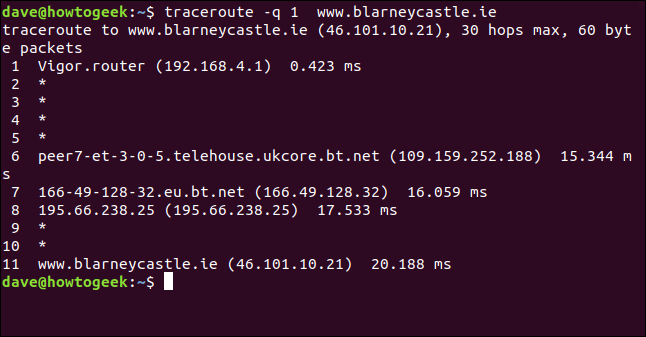
his sends a single probe to each hop.
Setting the Initial TTL Value
We can set the initial value of TTL to something other than one, and also skip some hops. Generally, the TTL values are set to one for the first set of tests, two for the next set of tests, and so on.
In case we set it to five then, the first test will attempt to get to hop five and skip hops one through four.
Because we know the Blarney Castle website is 11 hops from this computer then we will type the following to go straight to Hop 11:
traceroute -f 11 blarneycastle.ie
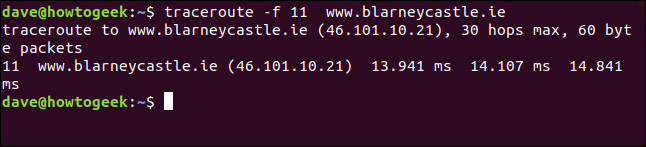
That will give us a nice, condensed report on the state of the connection to the destination.
Be Considerate
Traceroute is really a great tool to investigate network routing, check connection speeds, or identify bottlenecks. Windows also has a tracert command that functions similarly.
However, you don’t want to bombard unknown devices with torrents of UDP packets and be wary of including traceroute in scripts or unattended jobs.
The load traceroute can place on a network might adversely impact its performance. Until you’re in a fix-it-now kind of situation then, you might want to use it outside of normal business hours.