Moving from one phone to another can be sometimes much traumatic as changing schools or moving to a new city. You can simply use Google One to back up and restore Android to make the transition less painful. Here’s how to Back Up and Restore Android Using Google One.
What is Google One?
Every Google account usually includes 15 GB of storage shared across Gmail, Google Drive, and Photos. According to Google, the only files which do not consume your free space are “Shared with Me” items, along with photos and videos stored in “High Quality.”
Any media you purchased on Google Play also do not use your free space.
You can get additional Google One storage if you are ready to pay a monthly or annual fee. You can increase storage capacity from 100 GB to 30 TB. Other benefits also include customer support, family sharing up to six people, Google Store benefits, and hotel discounts.
You can choose from the following plans:
1. 100 GB: $1.99 per month or $19.99 annually.
2. 200 GB: $2.99 per month or $29.99 annually.
3. 2 TB: $9.99 per month or $99.99 annually.
4. 10 TB: $99.99 per month.
5. 20 TB: $199.99 per month.
6. 30 TB: $299.99 per month.
You simply can download and install the Google One app from Google Play for free. However, when you open the app, you will get a prompt to select a subscription. You can’t this app if you want to stick with the free, 15 GB plan only.
Back Up Your Android Device Using Google One
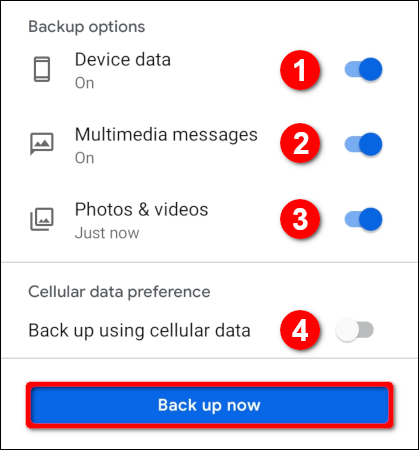
After installing, the first time you launch Google One app, it prompts you with three toggles to back up “Multimedia Messages,” “Photos and Videos,” and to “Back Up Using Cellular Data.” Simply enable these to suit your preferences. Google One enables the “Device Data” option by default.
When you are done then just tap on “Next.”

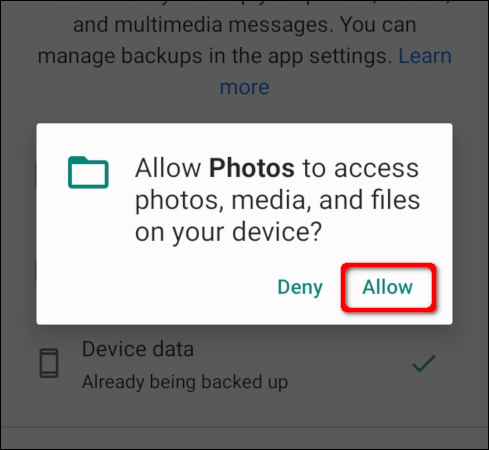
A permission prompt appears then Tap on “Allow” to grant “Photos” access to your photos, media, and files.
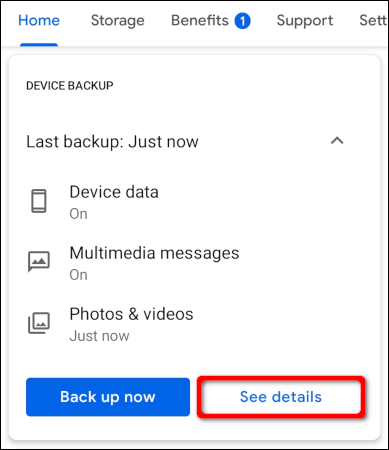
The app loads with the Home tab open by default. The first item you see is the “Device Backup” card.
If you are ready to save your phone’s media in its current state then, tap on “Back Up Now.” If you want to make changes now or later then, click “See Details.”
In case you tapped “See Details,” then you can change the back-up settings on the following screen. If you want you can toggle the “Device Data,” “Multimedia Messages, or “Photos and Videos” options on or off. You can also toggle-On or -Off the “Backing Up Using Cellular Data” option.
When you are done just tap on “Back Up Now.”
In the future, in case you want to keep your current settings then, you can just tap “Back Up Now” on the main page.
Kindly note that Google One doesn’t back up any media sent through the phone manufacturer’s texting app automatically. You have to save any attached media manually to Google Photos, which is backed up automatically in case you enabled the “Photos and Videos” back-up option only.
However, in case you use Google’s Messages app as your default messaging client then, Google One will back up everything automatically.
So, if you previously used Samsung’s app to send media, like stickers and videos, via text, you can simply install Google’s client. Then set it as the default to back up that media. You won’t see the media in either client until you restore from the Google One backup.
Restore Your Device Using Google One
In case you are moving from an old phone or replacing a damaged unit, Android’s setup process already includes a restore option if you enabled automatic backups and restores for your Google account.
Click on the backup created for your device. After that, select the backup items you want to return to the phone, including apps, call history, device settings, and messages, and then click “Restore.”
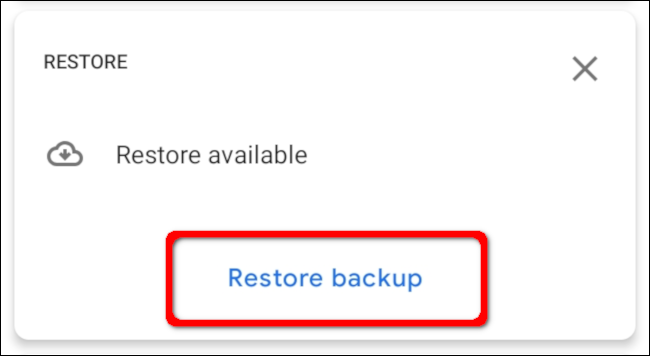
When your device is up and running, open the Google One app. You might see a “Restore” card under the “Device Backup” card. If you do then click on “Restore Backup” to get started.
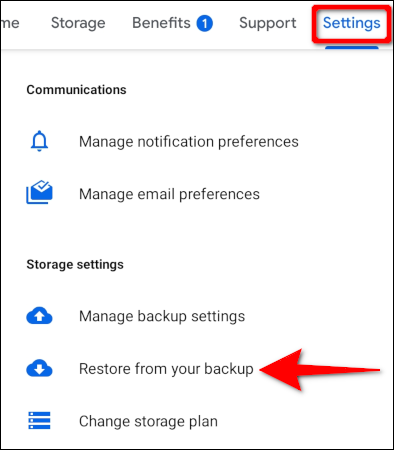
In case you don’t see a “Restore” card then click on “Settings” in the app’s toolbar. Next, click on “Restore from Your Backup” in the “Storage Settings” section.
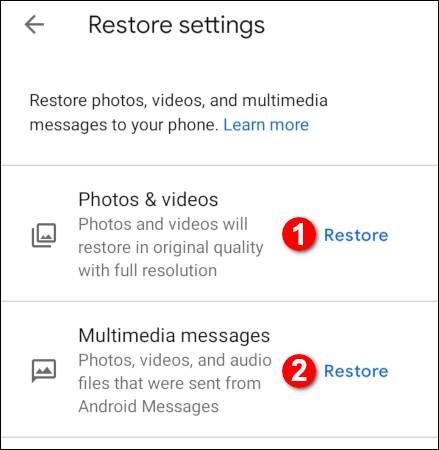
On the following screen, click on the “Restore” links to restore your images and videos in their original quality, and all media sent through Google’s Messages app.