When you finally decide to try Linux in a virtual machine. You can choose and downloaded a Linux distribution that looked good, created a virtual machine, installed it, played with it, ended up loving it. Here’s how to increase VirtualBox HDD Size with Clonezilla.

Now you want to see more of this fascinating Linux Land but you cannot because your virtual HDD is full. Unfortunately, there is no easy way to get rid of this problem.
However, you can try the conventional way. That is using command-line tools to expand it and a partition tool to expand the HDD size in the guest OS. There is another unconventional way too. That is by expanding the HDD size in Virtualbox and treat your virtual PC as a real one.
Rather than trying to alter the virtual machine’s HDD, we will do what we’d do with a “normal” PC simply create and “attach” a second HDD,
then use a standard, bootable version of the favourite imaging/backup tool CloneZilla.
CloneZilla will copy the contents of the old virtual HDD to the new one and then remove the old HDD, leaving you with more storage without having to deal with cryptic commands and strange failures.
There is also no need to back up things since your old virtual HDD will still exist if need be. Moreover, the latest versions of CloneZilla deal with the resizing of any partitions, so if everything goes according to plan, after this you only have to swap virtual HDDs and boot your virtual PC.
Resize VirtualBox HDD
With this approach, you will need to download a bootable ISO of CloneZilla (on the Host OS). You might also need the bootable ISO version of GParted, too, in case the resizing process fails.
Increase VirtualBox HDD Size with Clonezilla:
1. First Download CloneZilla and GParted‘s Live ISO version. Both of them offer different versions for different architectures, but since we are talking about a virtual PC, most versions will work, so you do not have to overthink which one to download.
You might not end up needing GParted in case CloneZilla successfully resizes the partitions in your virtual HDD. However, it is better to have it readily available in case CloneZilla fails this step.
2. From VirtualBox’s main window, choose from the virtual PC that’s out of storage space from the list on the left.
3. Visit its Settings by either tapping the gear icon, right-clicking and selecting Settings from the menu that appears or by pressing Ctrl + S on your keyboard.
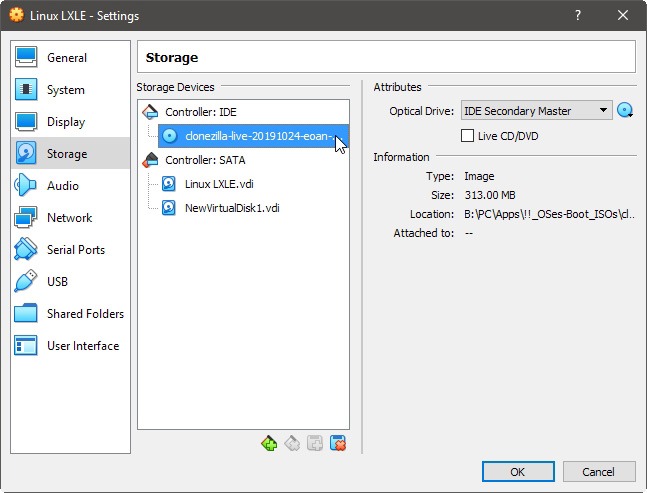
4. Choose the “Storage” options tab on the left side of its window. In case you have not changed the default options, your virtual PC will typically come with two controllers.
On the first one, you will see a virtual optical drive that allows the use of ISO files as if they were “normal” optical media (CDs and DVDs). On the second one, you will find the virtual hard drive that is filled completely to the brim.
Now choose the controller with the HDD and notice that two icons appear to the right. Then select the second one: “Adds hard disk.”

In the new pop-up window that appears, choose “Create new disk” to add a second HDD to the same controller as your existing one on your virtual PC.
5. VirtualBox will show you a series of simple steps for adding your new and blank HDD. In the first of these, hard disk file type, you are asked to choose the type of file to be used.
We recommend selecting the “official” format of VirtualBox, VDI (VirtualBox Disk Image). Proceed with a tap on Next.
You will then have to select if you want the new disk to be “Fixed” or “Dynamic.” We generally suggest the “Fixed” option that specifies that virtual disks will occupy all their space on the drives of your real computer from the beginning.
If they are 20GB in size then you are losing 20GB from your computer from the get-go. The “dynamic” option specifies that virtual disks will initially take up only the space of their actual contents and will expand until they reach their full size as you use them.
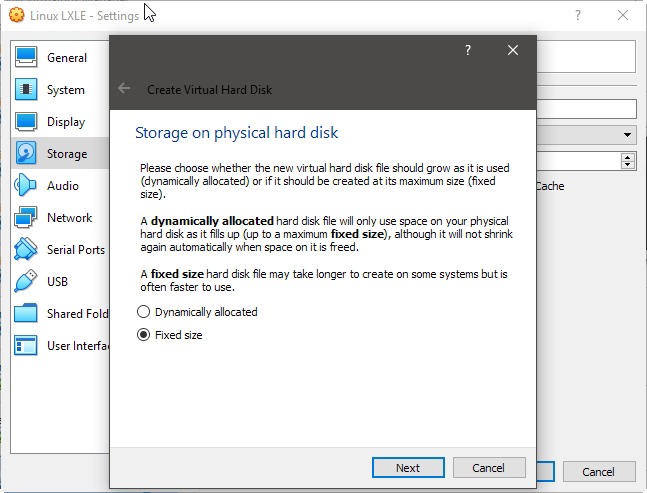
The problem with the second option is that when the virtual disks try to expand if you do not have the space needed on your real computer then you encounter problems.
And in this case, where we are trying to move an entire installation of an OS from one disk to another, it is best to try to minimize any chance of problems appearing. So, “Fixed size” it is.
The final step of the hard drive creation process will have you select the size of the new hard drive. You also need to declare a larger size than your existing, full HDD, to be able to “move over” to the new HDD and solve the “no space left” problem.
In our case, our original, full virtual HDD was 10GB in size, so we select double that, 20GB, for the new disk. This will leave us with 10GB of usable space after cloning the old HDD into the new one.
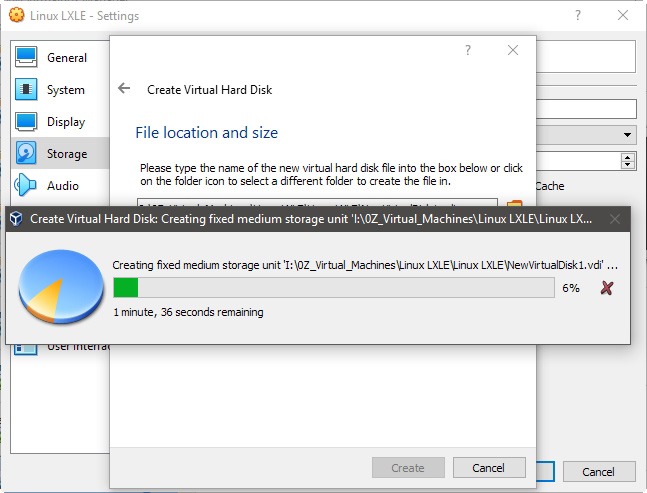
Tap on Create and VirtualBox will begin creating the disk file. If you chose the “Fixed” option and a large HDD size then this procedure can take some time.
Drives and controller
6. After the process completes, your virtual PC will have two HDDs connected to the controller you chose before. Now, move to the optical drive on the other controller.
Tap on it to select it and then click on the button with the disc that appears on the right of the “Optical Drive” pull-down menu. Locate and choose the CloneZilla ISO you downloaded earlier.
7. Now start your virtual machine and boot into CloneZilla. Then choose the first of the options, “Clonezilla live.
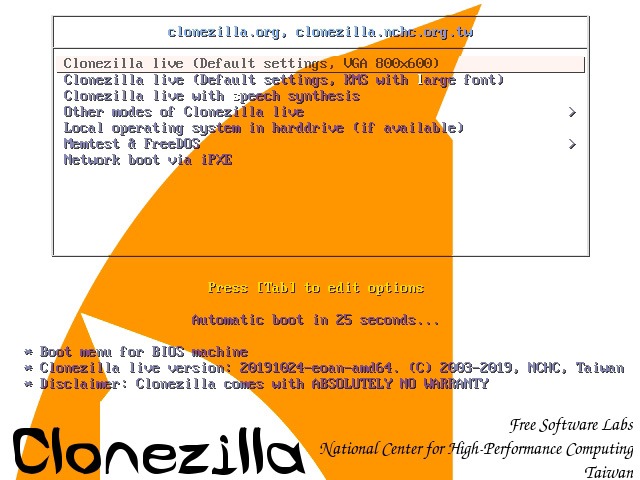
You will be prompted to choose the language used in CloneZilla’s interface and the keyboard.
In case you don’t need to swap languages then you can accept the default options by pressing enter in both cases. lastly, select “Start_Clonezilla” to start the application itself.
8. CloneZilla allows you to back up a hard drive in more ways. In our case, we will use the “device-device” option since we want to clone the contents of our existing HDD to a new one.
9. In the next step, choose “Expert mode” to gain access to all of CloneZilla’s options. Then select that you want to copy the entire disk, not just a partition from it, with the “disk_to_local_disk” option.
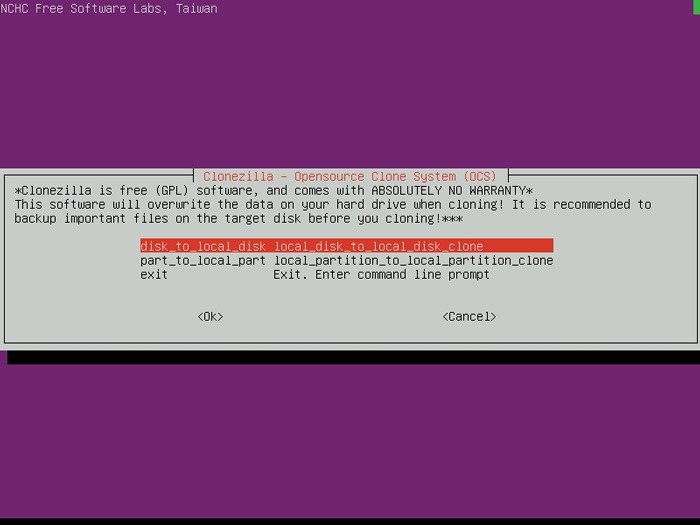
Virtualbox Hdd Upgrade Basic Settings And Expert Mode
10. To choose what will be copied were set the smaller drive as your “Source” and the larger one as your “target.” When you reach the “Advanced” options, ensure the first five are active: -g, -e1, -e2, -j2, and -r.
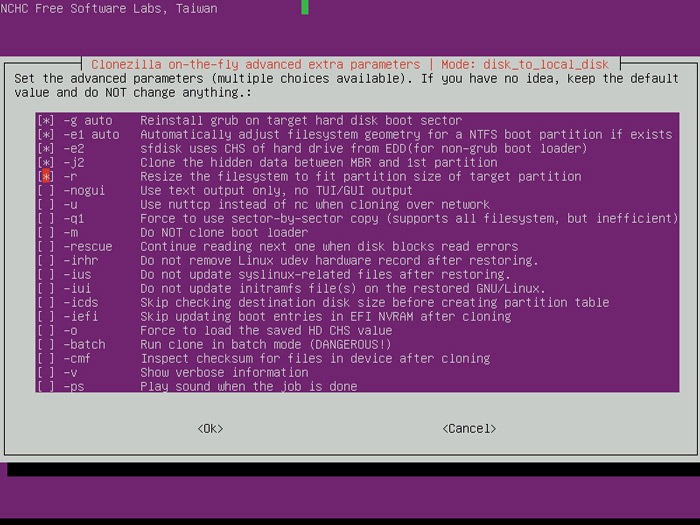
The last of them is the most important in our case, and the one that will make our approach simpler. Thanks to this -r, CloneZilla will try to automatically resize the partitions.
As they were copied from the old to the new hard drive by taking advantage of its larger space. Moreover, it will save you from having to run GParted or any similar program to expand them manually.
That is unless any problem appears, like some incompatibility of CloneZilla with a partition’s file system and errors in the virtual HDD structure, or something like that.
We have never met such a problem, but we have also never used anything more “exotic” than EXT2/3/4 for Linux. Also the typical FAT32/NTFS file systems for Windows OSes.
Partition resizing
11. Generally, unless your real PC’s HDDs are busted, it is rare for a virtual HDD to have any problems in its structure. Thus in most of the cases, you can safely skip checking for any errors by selecting the -sfsck option.
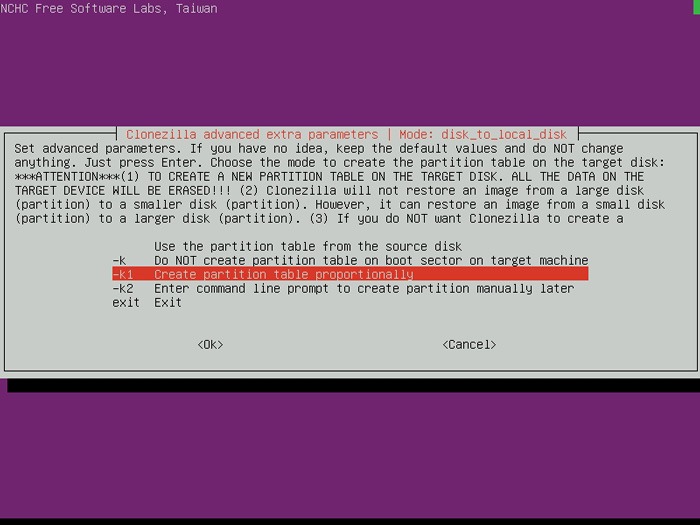
12. When asked how you want the partitions distributed, do not choose the default option. Instead, choose “-k1 Create partition table proportionally” to have CloneZilla expand the partitions and file systems as they are copied on the new HDD to take up its whole available space.
13. In the final option, choose that you want the virtual computer to shut down with “-pa poweroff Shutdown” when done.
Cloning in action
14. CloneZilla will ask a series of questions to which you can answer positively. Soon the process of cloning your old virtual disk into the new one will start.
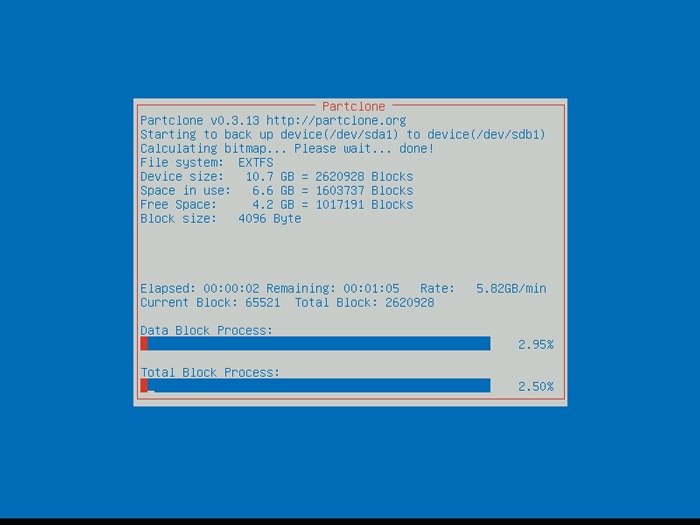
Just similar during the new HDD’s creation, the larger the disk is, and the more “stuff” that has to copy from the old to the new HDD, the longer this part of the process will take.
Swap the disks
15. When the process is complete, the computer will shut down (in case you had selected the shutdown option). Choose Settings again from VirtualBox’s main window. Then visit the Storage tab once more, and this time removes your old, full disk. Then right-click on it and select “Remove Attachment.”
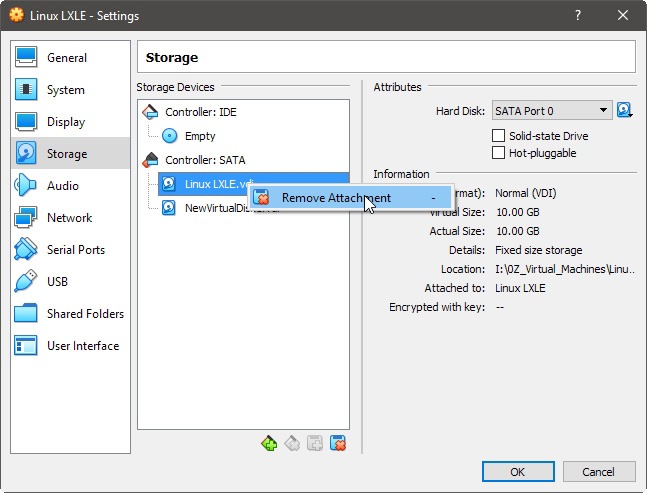
Kindly note that this will not delete the actual file from your real PC, so you will still have access to everything in case something went wrong.
16. Now, with your new and larger hard drive as the main drive, you can start your virtual machine as usual. If everything goes according to plan, you should be able to boot and log in to your OS. Check it out by typing df in a terminal to look at how much free space is available in your HDD.
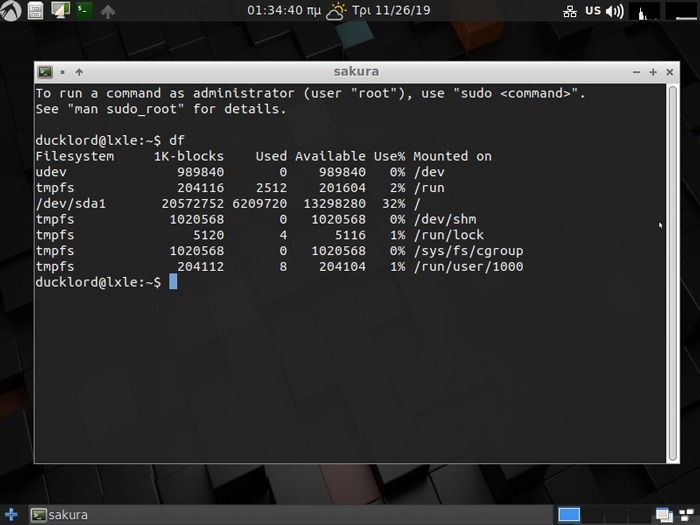
If the disk shows up as full again, then it is likely that CloneZilla has definitely failed to resize the partitions. You can, therefore continue resizing them with GParted now.
In this case, just shut down the virtual machine then insert the GParted ISO. As you did before with the CloneZilla ISO, and continue as in this guide. When you are completely sure that everything is working correctly. Then you can delete the old HDD file from your real computer to gain back the space it occupies.