Since its launch, Linux has been tailored to support a multi-user environment. With many users and groups on a working system, it is quite possible to encounter directories shared between users of the same group. Here’s how to use sticky bit to manage files on shared directories in Linux.

These issues generally arise from the sharing of files in the directories. In this post, we will discuss how you can make use of sticky bits to fine-tune file access permission on shared directories.
For demonstration purposes, we have a system with three users – john1, john2 and john3, all are members of the common group “johns”
Let us say “john1” creates a new directory known as “shared-dir” meant to be shared among all users of the “johns” group.
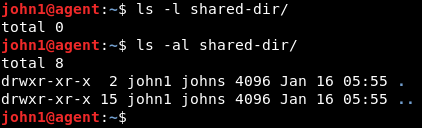
We can view the permission of the “shared-dir” with the ls command, which can be interpreted in the following table:
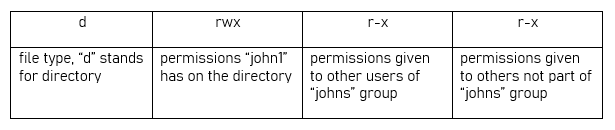
“john1” can only read the directory’s contents and can also write to the directory. Now that we are working with a shared directory, we want all the users of the group to be able to write to “shared-dir”.
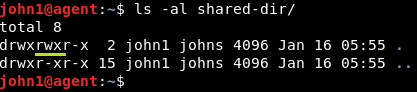
For this purpose, we will modify the permissions using chmod command. We will simply add the “write” permissions to all the users of “johns” group as shown below.
![]()
We can see the updated permissions for “shared-dir” as shown below. The portion underlined in yellow colour shows that “johns” group has been given “write” permissions.
Adding files to the Shared Directory
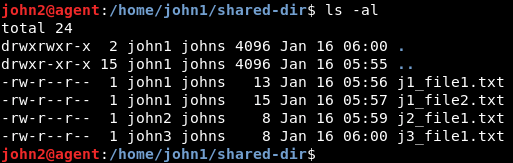
Now “john1” will add two files (j1_file1.txt and j1_file2.txt) to “shared-dir”
![]()
For easy remembering, the first two characters of the file name are synonymous with the user name.
![]()
Same, “john2” are also able to “write” to the directory “shared-dir”
![]()
![]()
There are four files in “shared-dir” now.
Is there a problem with the current setup?
The file “j1_file1.txt” was made by “john1” making “john1” the file owner. Now “john2” logs in and attempts to delete this file, and he will be able to do so.
“john1” was the file owner, however “john2” was able to delete it because the “write” permission was given to all the members of “johns” group.
This scenario is not usually ideal. We want all the users to be able to write to the directory however, only the file owner must be able to delete a file. But how can this be achieved?
Introducing Sticky Bit
The sticky bit is a very special permission that can be set on a directory which has “write” permissions set for the group with access to it. This bit basically ensures that all members of the group can write to the directory.
However, only the person who created a file, that is the file owner, can delete the file.
chmod command with the +t flag can be used to set the sticky bit on a directory.
![]()
The updated permission can be seen below.
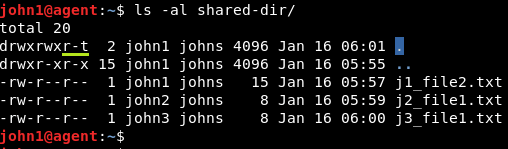
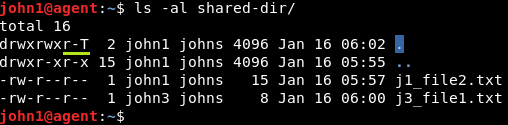
Now in case “john2” attempts to delete the file “j1_file2.txt” that was created by “john1”, then the operation is not permitted.

If you remove the “execute” permission for “others”, as shown below:
![]()
The presence of sticky bit on the directory is represented by an upper case “T” in the “others” portion of the permission string. However, the sticky bit behaviour on the directory remains the same.
Variant of “chmod” command
The numerical form of chmod command can also be used to set the sticky bit on a directory.
chmod nxyz <file_name>
where,
n = 1, referring to sticky bit. Other values of “n” refer to other special permissions.
x : permission given to file owner
y : permission given to group with access to the file
z : permission given to others
To set sticky bit on “shared-dir”, kindly use the following command:
chmod 1755 shared-dir
It produces the same result as using +t on existing default permissions.
The usage of sticky bit holds good for directories only. Generally, it would not make sense to use it for files.