AutoHotkey is no stranger in today’s world. To cover its complete functionality, it would require a series of books since AutoHotkey has evolved into a full programming language and now even allows you to create apps with it. Here’s how to automate anything in windows.
AutoHotkey is not only a platform for running scripts someone else made, but it is also mainly a scripting language allowing you to build your own solutions for your particular needs and to automate anything you do on your Windows desktop.
For this guide, we start with the bare basics that will get you started in turning any multi-step process into a single keystroke.
Here’s How to Use AutoHotkey to Automate Anything in Windows
Installation
First of all download and install AutoHotkey from its official site. Then choose the current version. Simply ignore the other two options – “V2” is a new version, incompatible with existing scripts and with a slightly different syntax, while “V1.0 Deprecated” is old and restricted.
Make a blank script
After the installation, AutoHotkey will have registered as the default app for files with the AHK extension. That is why it works as executables – AutoHotkey will parse them in realtime and executes their contents. Actually, though, AHK files are scripts you can open in any text editor.

Automate Windows With Ahk New Script
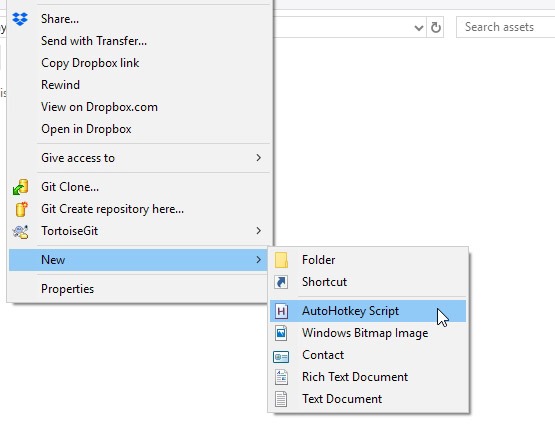
First, create a new folder for your first AutoHotkey script wherever you wish, enter it, right-click and create a “New -> AutoHotkey Script” from the new option in your right-click menu. Give it any name you wish.
Select how you will edit your scripts
Instead of double-clicking the AHK file you created like you will do to run a pre-made script just right-click on it and select Edit. You can edit AHK files in any text editor, however since scripting is a lite version of programming, it’s better if you use a program made for that purpose.
Anything from Atom to Sublime Text or VS Code will do good. In case you don’t have any such tool installed, and since your first scripts will be simple, you can even use Windows’s Notepad.
For those wondering, We personally use all those tools for other purposes like HTML, CSS, and some very basic JS, PHP, and Python, however for editing AHK scripts, we find ourself returning to the popular Notepad++.
Target specific apps or windows
Before we start, let us first check out the program we want to make a script for.
You can create any global scripts in AutoHotkey that will work everywhere, in every app and the Windows desktop, however, you can also target apps. This allows you to have, for example, the same shortcut doing different things in two different programs.

Automate Windows With Ahk Target Apps And Windows
Your script will be pre-populated with some basic settings. Do not modify them – type after those. Tap on the enter once or twice.
Enter this in your script:
#IfWinActive ahk_class Notepad

#if
This will tell AutoHotkey that anything following “IfWinActive” should only work in a window with a Notepad class – ahk_class Notepad. The #If after it closes the section so that anything following it will be discontinued to windows with a Notepad class.
Meet Window Spy
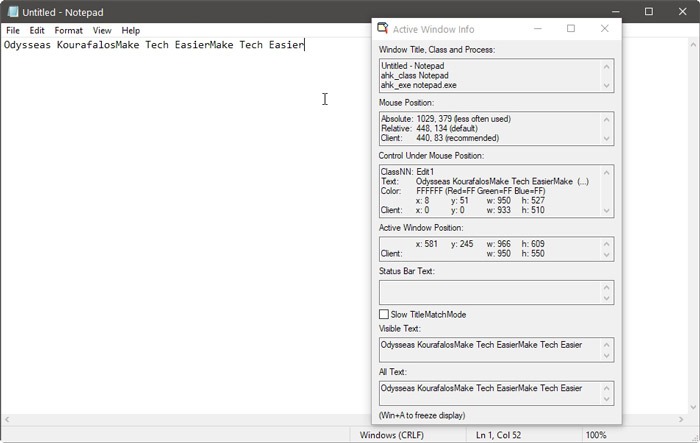
First, run your empty script to have the AHK icon appear in the Windows tray. Right-click on it and select Window Spy from the menu that pops up. Now, whenever you tap on any other window, AutoHotkey’s Window Spy will present you information about it.
Automate Windows With Ahk Windows Spy
At the very top, you will be able to see the different ways you can target it based on its title, class, and executable. In case you run Firefox and, with Window Spy on your screen, tap on its window.
You will see that its executable is “firefox.exe.” Now revise your script swapping the Notepad reference for #IfWinActive ahk_exe firefox.exe.
You could target any other window the same way to use Window Spy to investigate its title, class, or executable and target any of them. The short version is:
1. You can target windows by their title by using #IfWinActive accompanied by the title.
2. You can target windows by their class by using #IfWinActive ahk_class, followed by the class Window Spy recognized.
You can then target programs by their executable with #IfWinActive ahk_exeand the executable’s filename. Note that in this way, you will target all the program’s windows and not a specific one.
Check your mouse coordinates
Now with Window Spy active, turn your attention to the “Mouse Position” group of variables. This will show you the exact location of the mouse. Absolute will show the location in relation to your whole screen’s resolution.
The relative will show the location within the active window without being affected by its placement on the screen. This is the default and, in most cases, what you will probably use.
The client is the same as relative however doesn’t take into account any windows decoration – like the title bar or borders.
Replicating mouse movements and clicks
You now basically know how to create a new AHK script and target a specific window, however what about the mouse coordinates we talked about? To move your mouse to coordinates X, Y, as read by Window Spy, use MouseMove, X, Y ;. This moves the mouse to position X, Y.
Also, you must note how you can add comments in your code after the ; character. For multi-line comments, start with “/” and end with “/” – without the quotation marks. Moving the mouse is one thing and to click, you don’t have to move the mouse in a specific position beforehand.
Just use:
Click, X, Y ;For a left-click, or...

Click, right, X, Y ;For a right-click.
Automate Windows With Ahk Spying Mouse Coordinates
Kindly note that if you don’t enter any coordinates, the click will still happen where the mouse cursor is.
Replicate any keyboard keypress
We left the most important part of the equation for last that is the sendkeys. This is the command used in AutoHotkey to duplicate any keypresses. By using it, you can direct AutoHotkey to send any string of keypresses to any program, just like if you had pressed the keys yourself.
For example, the following:
sendkeys, Make Tech Easier
It will tell AutoHotkey to send the keypresses that make up the phrase “Make Tech Easier.” You can use any letters or numbers. Special keys have their own shortcodes and are surrounded by brackets. Some of them are:
1. {Tab}
2. {Shift}
3. {Control} or {Ctrl}
4. {Alt}
5. {F1 – F12)
6. {LWin}{RWin} Left and right Windows key, respectively
7. {Enter}
8. {Space}
9. {Backspace}
10. {Delete}
11. {Up}{Down}{Left}{Right} ;Cursor keys Up, Down, Left and Right
12. {Home}
13. {End}
14. {PgUp}{PgDown} ;Page Up and Page Down
15. {Volume_Up}{Volume_Down}{Volume_Mute} ;Media control shortcuts for controlling sound volume
You can also use numbers to simulate the repeated keypresses. The following will make AutoHotkey send five spaces to any active window, same as if you press the space bar five times. After that, type “Make Tech Easier,” followed by two presses of the Tab key and one of enter.
Send, {Space 5}Make Tech Easier{Tab 2}{Enter}
AutoHotkey will also set four symbols as modifiers that help in sending shortcut key combinations to the active program. This will affect only the very next character following them and are:
1. ! for Alt
2. + for Shift
3. ^ for Control
4. # for Windows Key
The following would send to the active window the combination Ctrl + A to, say, choose all text, then Ctrl + C to copy it to the Clipboard:
Send, ^A^C
Make your first script
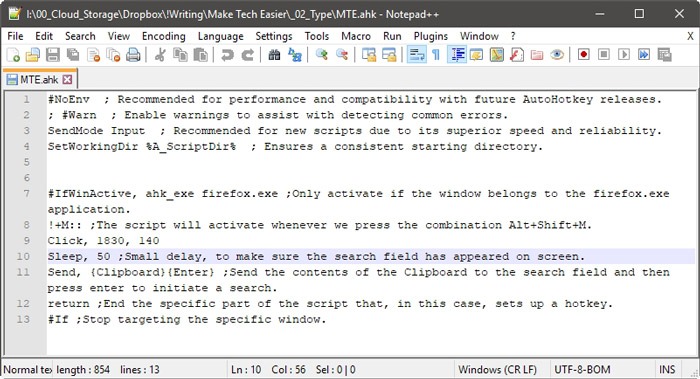
Let’s see how everything we saw up to now translates to a real-world example by creating a script that will add a shortcut to Make Tech Easier’s search function. By pressing a hotkey, the mouse will move and click the search icon on our site. Then enter whatever is in the Clipboard in the search field and send an “Enter” to start a search.

Automate Windows With Ahk Your First Script
We begin by checking with Window Spy and find that the coordinates for the search icon, when Firefox’s window is maximized in a 1920 x 1080 screen, are close to X=1835 and Y=135.
Those numbers differ because the search icon is larger than a single pixel, so X = 1830 and Y = 140 would also work since the cursor is still pointing at the icon when at those coordinates. Knowing this, we can write:
#IfWinActive, ahk_exe firefox.exe ;Only activate if the window belongs to the firefox.exe application.

!+M:: ;The script will activate whenever we press the combination Alt+Shift+M.

Click, 1830, 140

Sleep, 50 ;Small delay, to make sure the search field has appeared on the screen.

Send, {Clipboard}{Enter} ;Send the contents of the Clipboard to the search field and then press enter to initiate a search.

return ;End the specific part of the script that, in this case, sets up a hotkey.

#If ;Stop targeting the specific app\window.
Yes, it is that much simple, almost like writing in plain English. And, if you think about it, this will allow you to automate pretty much anything you do on your computer.
1. Would you like to map launching five applications or Ryu’s “Hadouken” move in Street Fighter to a single keystroke?
2. To move the mouse cursor to a specific point in a window and click 50 times in inhuman rapid succession?
3. To make Caps Lock more useful by turning it into the middle-click your mouse lacks?
This all can be all done in precisely the same way. Just think about all the procedures you repeat every day, break them down to the parts of their sum and replicate each part with AutoHotkey to vastly simplify how you use your computer and boost your productivity.
Congratulations! now you know how to use AutoHotkey to automate anything in Windows.

